A time to say, "Whoo Hooo!"
First up, I want to announce three winners for the next set of lesson plans...
They are three ladies who bought my plans and if you are one of them I need you to email me at ccingit@gmail.com to let me know if you want Lessons 16 and 17. Please respond with the matching email address you listed on your Pay Pal invoice by Wednesday, January 23rd.
They are
Lisa V. (from Ohio)
Erika B. (from Colorado)
Amber W. (from Oklahoma)
Our next giveaway will be a point for every friend you refer and every pin/ re pin on Pinterest, and like/ comment/ share on FB.
More details to come when the plans go on sale.
Thanks so much for spreading the word on the plans and sharing with your friends.
I really appreciate it!
Word of mouth is how I see this business growing.
As for the "How To... "
In going with the saying, "You can give a man a fish and feed him for a day, or teach a man to fish and feed him for a lifetime."
Here's your fishing lesson. :)
I wanted to offer a quick step by step tutorial on "How To" make one of your own History Sentence Fact Sheet. You can of course you my template this week (scroll to bottom for download) and add in any factual sentence you'd like or make your own.
Here's your fishing lesson. :)
I wanted to offer a quick step by step tutorial on "How To" make one of your own History Sentence Fact Sheet. You can of course you my template this week (scroll to bottom for download) and add in any factual sentence you'd like or make your own.
These are really great for our school board when reviewing for the week.
The program I use is PowerPoint as it's very easy for importing/ manipulating pictures, texts, links, etc.
First thing I do is I use Google images to select and search out images that are relevant. After right clicking and saving those to my computer I open Powerpoint and do the following steps.
1) I change my "Page Setup".
Click on the vertical "A"
Go to Insert Picture from your saved location. I always save mine on my desktop.
Repeat till all your pictures are placed. Select a picture and grab from a corner (see below) to enlarge or decrease it.
Insert your text box.
Click and drag your cursor to make it appear and type in any sentence you wish.
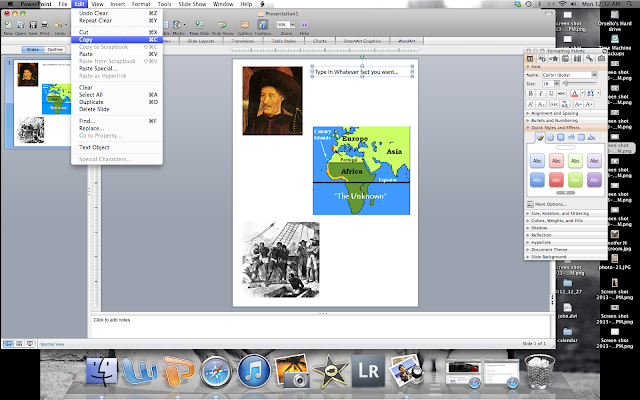
Select your text box corners as shown and select copy

Repeat the step to add more text blocks. I usually add one to each picture as to break my facts up.
To change the font, highlight and go to the toolbox window.
Repeat or click on size as well. Repeat with each text box.
Now you are ready to make your own!
Here's my template for 15. Happy Creating!
Please link back here if you post or use this tutorial for your blog.
I made a Science Fact sheet as well. I did it the exact same way.
I first saw the picture from And Here We Go blog. If you haven't checked Melody out, I'd highly recommend going there. She is always leap years ahead of the planning and has great books and links for all.
Just a note the science fact sheet lists a mountain that is not on the picture. It is replaced with the highest one in Oceania. So be aware as you're teaching your little ones. Thankfully it falls in the same order and you can just cover that name and rewrite the one from Australia if you wish.
I wanted to let you know I'm updating the site. One page I added was "Busy 3 Yr Olds"- if you have little ones in the house, I thought to let you know I'll be positing weekly what I do with Lucy on that page. The focus will be on manipulative based for Reading/ Math activities.
Also, I updated the Geography cards for weeks 13-18, so head over to the Geography tab and click on the downloadable tab for PDF's.
Have a great Monday!
Blessings to you all!
-Crecia


No comments:
Post a Comment